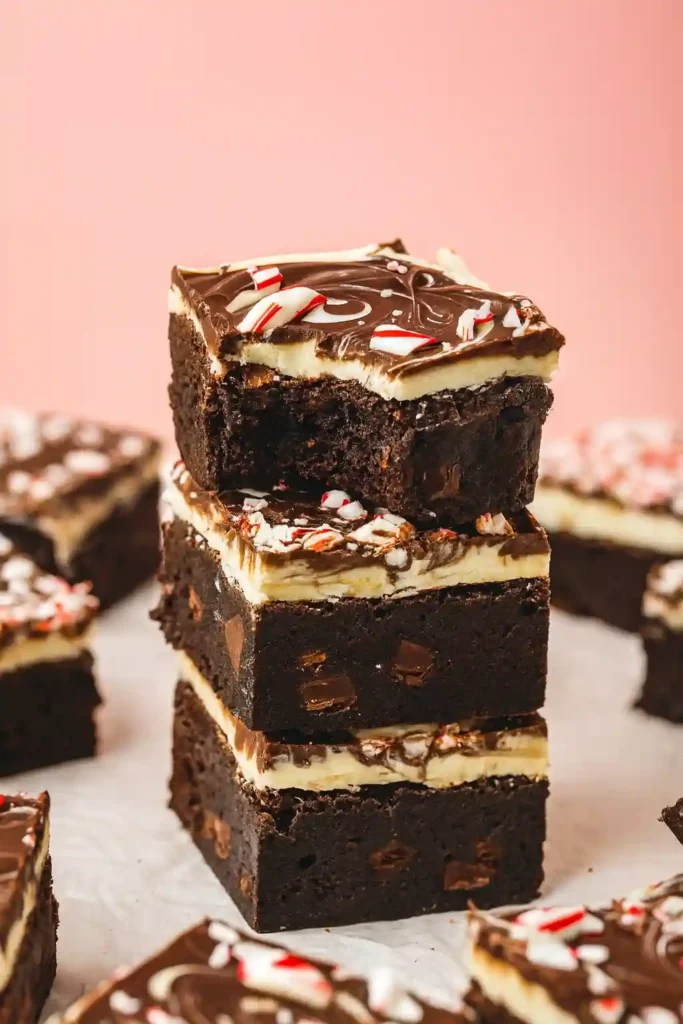
There’s something magical about the combination of rich fudgy brownies and cool peppermint crunch—especially when the holiday season rolls in. Peppermint bark brownies are that perfect middle ground between a classic chocolate treat and a festive dessert that looks (and tastes) like it came straight out of a cozy holiday movie.
They’re perfect for holiday parties, cookie exchanges, gift boxes, or honestly… just a chilly night in with a cup of hot cocoa and your favorite blanket. These brownies give you the dense, chocolatey base you love, topped with creamy white chocolate and crushed candy canes that add sparkle and crunch with every bite.
Equipment
- 8×8 inch square baking pan
- Parchment paper
- Mixing bowls
- Whisk or hand mixer
- Spatula
- Microwave-safe bowl or double boiler (for melting chocolate)
- Measuring cups and spoons
- Sharp knife (for slicing)
- Wire cooling rack
Ingredients You’ll Need
For the Brownie Layer:
- ½ cup (115 g) unsalted butter, melted
- 1 cup (200 g) granulated sugar
- 2 large eggs
- 1 tsp vanilla extract
- ½ cup (60 g) all-purpose flour
- ½ cup (50 g) unsweetened cocoa powder
- ¼ tsp salt
For the Peppermint Bark Layer:
- 1 ½ cups (260 g) white chocolate chips or chopped white chocolate
- ½ tsp peppermint extract
- 4–5 candy canes, crushed (about ½ cup)
Nutrition (Per Serving)
| Nutrient | Amount |
|---|---|
| Calories | 240 kcal |
| Carbohydrates | 30 g |
| Protein | 3 g |
| Fat | 12 g |
| Saturated Fat | 7 g |
| Sugar | 24 g |
| Fiber | 2 g |
| Sodium | 85 mg |
(Values are approximate and will vary based on ingredients used.)
Step-by-Step Baking Instructions
1. Prepare Your Brownie Batter
Preheat your oven to 350°F (175°C) and line a square baking pan with parchment paper, leaving an overhang for easy lifting later. If making brownies from scratch, melt your butter and mix with sugar, eggs, vanilla, and cocoa powder until glossy. Stir in flour and a pinch of salt just until combined.
If using a mix, follow the box instructions, but consider adding an extra splash of vanilla or a touch of espresso powder to deepen the chocolate flavor.
2. Bake the Brownies
Pour the batter into your lined pan and bake for 20–25 minutes (or according to your recipe/mix). You want them just set in the center—overbaking will make them dry, and no one wants crumbly peppermint bark brownies.
3. Cool Completely
This step is key. If the brownies are even slightly warm, the white chocolate layer will melt unevenly. Let the brownies cool in the pan for about 20 minutes, then transfer the whole slab to a wire rack to cool fully.
4. Melt the White Chocolate
Using a double boiler or microwave (in short 15–20 second bursts, stirring each time), melt your white chocolate until smooth. Stir in ½ teaspoon of peppermint extract for a subtle but fresh flavor.
5. Spread & Top
Pour the melted white chocolate over the cooled brownies, spreading it evenly to the edges with a spatula. Immediately sprinkle your crushed candy canes or peppermint candies over the top before the chocolate sets.
6. Chill & Slice
Place the tray in the fridge for about 15–20 minutes, just until the white chocolate firms up. Then, lift the brownies out using the parchment paper and cut into squares with a sharp knife. For clean cuts, warm the knife under hot water, wipe it dry, and slice.
Tips for Perfect Brownies
- Don’t Overbake: Slightly underdone brownies will set as they cool and give that perfect fudgy bite.
- Use High-Quality Chocolate: It makes a big difference in both the brownie base and the peppermint bark layer.
- Room Temp Ingredients: This helps everything blend smoothly for an even batter.
- Chill Before Slicing: It helps the peppermint layer stay neat rather than shattering.
Adding Peppermint Flavor and Texture
The beauty of this recipe is the balance between chocolate richness and peppermint brightness. A few ways to adjust the flavor to your liking:
- Subtle Mint: Just use peppermint candies on top.
- Medium Mint: Add ½ tsp peppermint extract to the white chocolate layer.
- Bold Mint: Also mix ¼ tsp peppermint extract directly into your brownie batter for a double hit.
For texture, crushed candy canes give a satisfying crunch, but if you prefer a smoother top, sprinkle finely crushed peppermint or even a dusting of crushed freeze-dried raspberries for a fun twist.
Ideal Pairings for the Brownies
Peppermint bark brownies shine on their own, but they also pair beautifully with:
- A mug of hot cocoa topped with whipped cream
- A scoop of vanilla bean ice cream
- A peppermint mocha if you’re going for that full-on holiday café vibe
- Warm mulled wine or spiced cider for adults
They also make a lovely gift box addition, sitting pretty among cookies and truffles.
Creative Variations to Try
Once you’ve mastered the classic, mix it up!
- Oreo Peppermint Brownies: Fold crushed Oreos into the batter, then top with peppermint bark.
- Double Chocolate Peppermint Swirl: Swirl melted dark chocolate into the white chocolate layer before sprinkling candy canes.
- Gluten-Free Version: Use almond flour or a 1:1 gluten-free baking blend.
- Mini Brownie Bites: Bake the brownies in mini muffin tins, then top each with a dollop of white chocolate and crushed candy cane. Perfect for parties!
Storage and Freezing Tips
Room Temperature: Store in an airtight container at room temp for up to 3 days. Keep parchment between layers to prevent sticking.
Refrigeration: Storing in the fridge helps the peppermint layer stay crisp, but let the brownies come to room temperature before serving for the best texture.
Freezing: Yes, you can freeze them! Wrap each square tightly in plastic wrap, place in a freezer bag, and freeze for up to 2 months. Thaw overnight in the fridge before serving.
FAQs
Can I make these brownies ahead of time?
Yes! In fact, making them a day in advance allows the peppermint flavors to really meld. Store them in the fridge and bring to room temperature before serving.
What if I don’t like white chocolate?
You can absolutely use dark or milk chocolate for the topping. Just skip the peppermint extract if using milk chocolate—it can get overpowering.
How do I keep the candy canes from melting into the white chocolate?
Make sure the melted chocolate layer has cooled just a bit before sprinkling. This helps the candy canes sit on top rather than dissolving in.
Can I make these brownies without peppermint?
Of course! Swap out the peppermint for crushed pretzels, nuts, or sprinkles for a fun non-minty version.
Why did my white chocolate seize up?
White chocolate is temperamental. If it’s overheated or gets even a drop of water in it, it can seize. Always melt gently, and avoid using wet bowls or utensils.
Enjoy Your Festive Treat!
There you go—your peppermint bark brownies are ready to steal the holiday spotlight. Whether you gift them, serve them at a party, or keep them all to yourself (no judgment!), they’re sure to bring smiles all around.

Peppermint Bark Brownies
Ingredients
Method
- Preheat & Prepare: Preheat your oven to 350°F (175°C). Line an 8×8-inch baking pan with parchment paper, leaving overhang on the sides for easy lifting.
- Make Brownie Batter: In a large bowl, whisk together melted butter, sugar, eggs, and vanilla until glossy. Add flour, cocoa powder, and salt; stir until just combined.
- Bake: Spread the batter evenly in the pan and bake for 20–25 minutes, or until the center is just set. Don’t overbake.
- Cool Completely: Allow the brownies to cool in the pan for 20 minutes, then transfer the whole slab to a wire rack to cool fully before topping.
- Melt White Chocolate: In a microwave-safe bowl or double boiler, gently melt the white chocolate until smooth. Stir in peppermint extract.
- Top with Peppermint: Pour melted white chocolate over the cooled brownies, spreading evenly to the edges. Immediately sprinkle crushed candy canes on top.
- Chill: Refrigerate for 15–20 minutes, or until the white chocolate is firm.
- Slice & Serve: Lift the brownies out of the pan using the parchment. Slice into squares with a sharp, warm knife for clean edges. Enjoy!
Notes
- Flavor Adjustments: For a bolder peppermint flavor, add ¼ tsp peppermint extract to the brownie batter as well.
- Clean Slices Tip: Warm your knife under hot water and wipe dry between cuts for neat edges.
- Storage: Store at room temperature for 3 days, in the fridge for up to 5 days, or freeze for up to 2 months (wrap tightly).
- Variations: Try swirling dark chocolate into the white chocolate layer or folding crushed Oreos into the brownie batter for a fun twist.