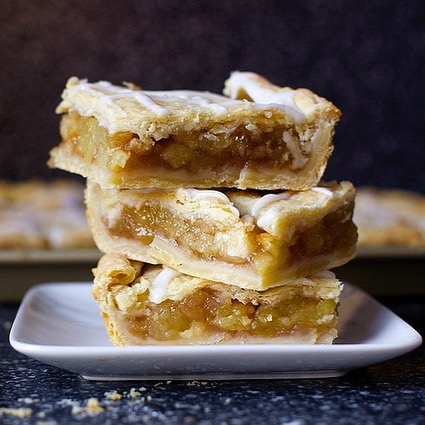
Some desserts don’t need to impress with fancy techniques- they win you over by simply feeling right. Yummy apple slab pie is exactly that kind of dessert.
The smell of apples and cinnamon filling the kitchen, the sound of a flaky crust crackling as you cut into it, the way everyone seems to hover nearby waiting for the first slice- it all feels familiar and comforting.
Slab pie takes everything we love about classic apple pie and makes it more relaxed. No stressing over perfect edges or worrying about a pie collapsing when you slice it. This is apple pie meant to be shared, passed around, and enjoyed without overthinking it.
Why Apple Slab Pie Is Such a Favorite
One of the best things about apple slab pie is how forgiving it is. It doesn’t demand perfection. A slightly uneven crust or rustic edges just add to its charm. It bakes evenly in one large pan, making it easier to serve and ideal for gatherings.
In my opinion, slab pie is one of the most practical desserts you can make. It feeds a crowd, travels well, and still delivers that classic apple pie flavor everyone loves.
What Makes This Apple Slab Pie So Good
A really good apple slab pie is all about balance. You want tender apples that still hold their shape, a filling that’s sweet but not overwhelming, and a crust that stays flaky instead of soggy.
This recipe focuses on those details without complicating things. The apples are sliced thin so they cook evenly, the spices are warm and familiar, and the crust does its job- holding everything together while adding that buttery crunch.
Ingredients
Apple Filling
- 10 cups peeled and thinly sliced apples (Granny Smith, Honeycrisp, or mix)
- ¾ cup granulated sugar
- ¼ cup brown sugar
- 2 tablespoons lemon juice
- 3 tablespoons all-purpose flour or cornstarch
- 1½ teaspoons ground cinnamon
- ¼ teaspoon ground nutmeg
- ¼ teaspoon salt
Crust
- 2 prepared pie crusts (homemade or store-bought)
- 1 large egg, beaten (for egg wash)
- 1 tablespoon coarse sugar (optional)
Choosing the Best Apples for Slab Pie
When it comes to baking, not all apples behave the same way. Firm apples work best here. Granny Smith apples are a favorite because they’re tart and hold their shape, balancing the sweetness of the filling nicely.
Honeycrisp, Braeburn, or Pink Lady apples are also great options. If you want deeper flavor, mix two types. That little bit of contrast makes the filling taste more layered and interesting.
Preparing the Filling the Right Way
Peel, core, and slice the apples thinly. Thin slices bake evenly and give you a soft, tender filling without crunchy surprises. Toss the apples with sugar, cinnamon, a pinch of salt, lemon juice, and a little flour or cornstarch to thicken the juices.
At this point, the apples should be coated but not swimming. As the pie bakes, the apples release their natural juices, turning everything into that cozy, syrupy filling we all love.
The Crust: Keep It Simple
You can absolutely use store-bought pie dough for slab pie, and there’s no shame in that. Homemade dough is wonderful if you enjoy making it, but this dessert doesn’t depend on it.
Roll the dough large enough to fit your pan, press it gently into the corners, and don’t stress if it’s not perfect. Slab pie is meant to look homemade- that’s part of its appeal.
How to Make It (Step by Step, No Stress)
Step 1: Get the pan and oven ready
Preheat your oven and line a rimmed baking sheet with parchment paper. This makes cleanup easier and helps prevent sticking. A light greasing adds extra peace of mind.
Step 2: Roll out the bottom crust
Roll the dough into a large rectangle and carefully place it in the pan. Press it gently into the corners and up the sides. If it tears, just patch it- this isn’t a beauty contest.
Step 3: Add the apple filling
Spread the apple mixture evenly over the crust. Take a moment to level it out so every piece bakes evenly.
Step 4: Top it off
Add the top crust or arrange lattice strips. Trim excess dough and seal the edges. If using a full crust, cut a few small slits so steam can escape.
Step 5: Brush and finish
Brush the crust with egg wash and sprinkle with a little sugar if you like a golden, slightly crisp top.
Step 6: Bake until golden and bubbling
Bake until the crust is golden and the filling is bubbling. If the crust browns too quickly, loosely cover it with foil and let it finish baking.
Step 7: Let it cool
Allow the slab pie to cool for at least 30–45 minutes. This helps the filling set and makes slicing much easier.
Why Cooling Time Matters
Cutting into the pie too soon can cause the filling to spill out. Letting it cool gives the juices time to thicken. The slices hold together better, and the texture is much more satisfying.
Warm slices are wonderful, but room temperature is just as good-and often easier to serve.
Serving Ideas
Apple slab pie is delicious all on its own, but it’s even better with a scoop of vanilla ice cream or a dollop of whipped cream. A drizzle of caramel sauce makes it feel extra special without much effort.
Because it’s easy to slice, it’s perfect for casual gatherings where people can grab a piece, wander off, and come back for seconds.
Nutrition Facts (Per Serving)
| Nutrient | Amount |
| Calories | 320 kcal |
| Carbohydrates | 45 g |
| Protein | 4 g |
| Fat | 14 g |
| Fiber | 3 g |
| Sugar | 26 g |
| Sodium | 220 mg |
Storing and Leftovers
Cover leftovers tightly and store them in the refrigerator for up to four days. Reheat individual slices in the microwave or warm the whole pan in the oven.
Slab pie also freezes well. Wrap slices tightly and freeze them for later- future you will be very happy.
A Dessert Meant to Be Shared
Yummy apple slab pie isn’t about perfection. It’s about comfort, generosity, and the simple joy of sharing something warm and familiar. In my opinion, those are the best kinds of desserts- the ones that bring people together and make any day feel a little cozier.
Yummy Apple Slab Pie
Ingredients
Method
- Preheat oven to 375°F (190°C). Line a rimmed baking sheet (9×13 or similar) with parchment paper.
- Roll out one pie crust and press it gently into the prepared pan, covering the bottom and sides.
- In a large bowl, toss apples with sugars, lemon juice, flour, cinnamon, nutmeg, and salt until evenly coated.
- Spread the apple mixture evenly over the bottom crust.
- Place the second crust over the apples or cut into strips for a lattice top. Trim and seal edges.
- Cut small slits in the top crust if using a full crust.
- Brush with egg wash and sprinkle with coarse sugar if desired.
- Bake for 45–55 minutes, until the crust is golden and the filling is bubbling.
- Let cool for at least 40 minutes before slicing.
Notes
- Use firm apples to prevent a mushy filling.
- Let the pie cool before slicing for cleaner pieces.
- Serve warm or at room temperature with ice cream or whipped cream.
- Leftovers keep well in the refrigerator for up to 4 days.
- Slab pie freezes well for make-ahead desserts