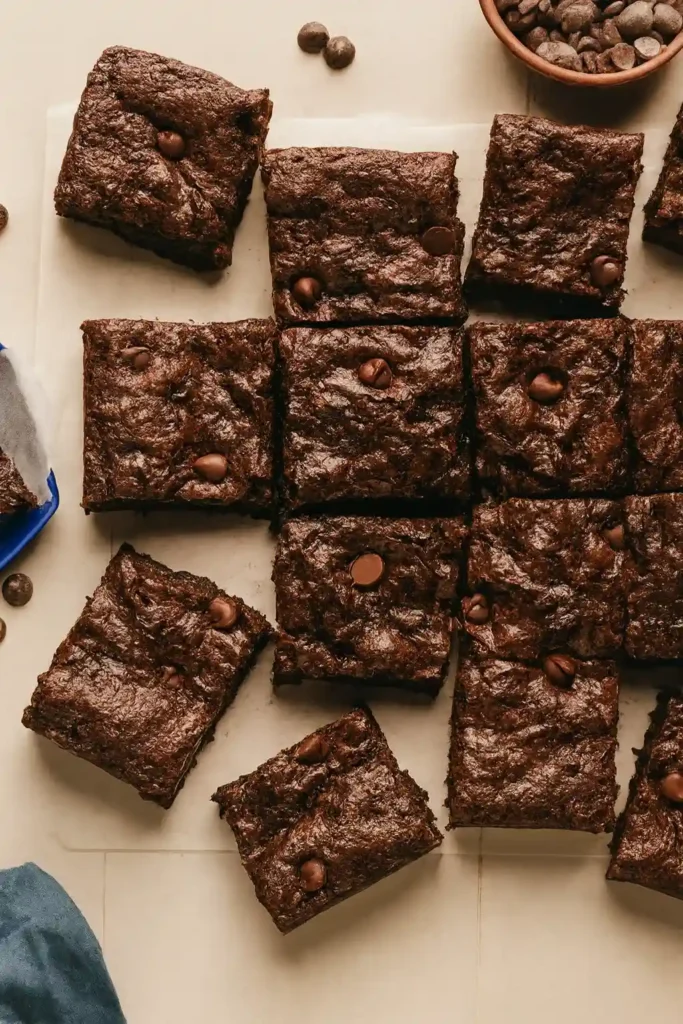
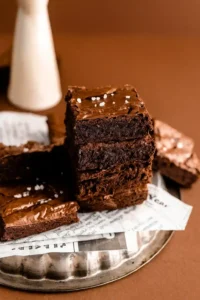
Who says you need gluten to make the perfect brownie? These Gluten Free Brownies are rich, fudgy, and every bit as indulgent as the classic version. With their glossy tops, chewy edges, and deeply chocolatey centers, they’re guaranteed to impress both gluten-free and non–gluten-free dessert lovers.
If you love cozy, classic bakes, you might also enjoy our Perfect Chocolate Chip Cookies — they’re chewy, buttery, and just as irresistible. Pairing brownies and cookies on a dessert board is always a hit for parties or holiday spreads.
Ingredients for Gluten Free Brownies
The key to making brownies that taste just like (or even better than) the original is using the right ingredients. Here’s what you’ll need:
Dry Ingredients:
- ½ cup (60g) gluten-free all-purpose flour (1:1 blend with xanthan gum)
- ¼ cup (25g) unsweetened cocoa powder (high-quality recommended)
- ¼ tsp salt
Wet Ingredients:
- ½ cup (115g) unsalted butter (or dairy-free butter)
- 4 oz (115g) dark chocolate, chopped (or extra ¼ cup cocoa powder)
- 1 cup (200g) granulated sugar
- 2 large eggs, room temperature
- 1 tsp vanilla extract
Optional Add-ins:
- ½ cup (85g) chocolate chips or chunks
- ½ cup (50g) chopped walnuts or pecans
- 2 tbsp peanut butter (for swirling)
👉 If you love baking with alternative flours and natural sweeteners, you should also check out these Maple Brown Sugar Cookies — they highlight how simple ingredients can create beautiful textures and flavors.
Step-by-Step Baking Instructions
Even if you’re new to gluten-free baking, this recipe is simple and foolproof. Here’s how to do it:
1. Preheat and Prep
Preheat your oven to 350°F (175°C). Line an 8×8-inch baking pan with parchment paper, leaving some overhang on the sides for easy removal later.
2. Melt Butter and Chocolate
In a small saucepan, melt the butter and chopped dark chocolate over low heat, stirring until smooth. If using cocoa powder only, melt butter first, then whisk in the cocoa. Set aside to cool slightly.
3. Mix Wet Ingredients
In a large bowl, whisk sugar, eggs, and vanilla extract together for 1–2 minutes, until thick and slightly pale. This step helps form the shiny top layer brownies are famous for.
4. Combine Chocolate and Egg Mixtures
Slowly pour the melted chocolate mixture into the egg mixture, whisking constantly until glossy and smooth.
5. Add Dry Ingredients
Sift in the gluten-free flour, cocoa powder, and salt. Gently fold everything together with a spatula until just combined — don’t overmix.
6. Bake
Pour the batter into your prepared pan. Bake for 20–25 minutes, or until the center is just set but still slightly soft. A toothpick should come out with moist crumbs, not clean.
7. Cool and Slice
Let the brownies cool completely before lifting them out of the pan and slicing. This allows the fudgy center to firm up without becoming cakey.
👉 This whisking and folding technique is the same one used for our Mocha Chocolate Crinkle Cookies — it’s key to getting that glossy surface and soft interior without overdeveloping the batter.

Nutrition (per serving)
| Nutrient | Amount |
|---|---|
| Calories | 190 kcal |
| Carbohydrates | 23 g |
| Protein | 3 g |
| Fat | 10 g |
| Saturated Fat | 6 g |
| Cholesterol | 45 mg |
| Sodium | 75 mg |
| Fiber | 2 g |
| Sugar | 17 g |
| Calcium | 15 mg |
| Iron | 1.5 mg |
| Potassium | 110 mg |
Tips for Perfectly Fudgy Texture
Want brownies that are soft, dense, and ultra-fudgy? Follow these tips:
- Melted butter and chocolate give brownies their classic fudgy texture.
- Whisk eggs and sugar properly for that shiny, crackly top.
- Don’t overbake. Slightly underbaked centers are what make brownies gooey.
- Cool completely before slicing to keep clean edges and a perfect interior.
For even more texture tricks, check out our Chewy Sugar Cookies — they use similar mixing methods to achieve the perfect chew.
Popular Flavor Variations to Try
Gluten free brownies are a fantastic base for flavor experiments. Try one of these fun variations:
- Salted Caramel Swirl: Add dollops of caramel sauce and swirl before baking.
- Espresso Brownies: Add 1 tsp instant espresso powder to intensify the chocolate.
- Nutty Crunch: Fold in chopped walnuts or pecans for texture.
- Peanut Butter Swirl: Add spoonfuls of peanut butter and swirl for a marbled effect.
- Double Chocolate: Stir in chocolate chips for extra gooeyness.
- Mint Chocolate: A few drops of peppermint extract create a refreshing twist.
👉 If you love seasonal flavors, these Pumpkin Cheesecake Cookies pair beautifully with fudgy brownies on dessert trays — think fall bake sales or Thanksgiving platters.
Common Mistakes to Avoid
Gluten-free baking is simple once you know what to watch for. Here are common mistakes and how to avoid them:
- Using the wrong flour blend: Stick with a reliable 1:1 gluten-free flour with xanthan gum.
- Overmixing the batter: Leads to dense, cakey brownies. Fold gently.
- Overbaking: Gluten-free brownies can dry out quickly. Pull them out when slightly underdone.
- Cutting too soon: Give them time to cool for clean slices.
- Skipping flavor boosters: Vanilla and salt make a huge difference.
Storage Tips for Freshness
These brownies store beautifully, whether you make them ahead or freeze leftovers:
- Room Temperature: Store in an airtight container up to 3 days. Place parchment between layers.
- Refrigerator: Lasts up to 5 days. Warm slightly before eating to restore texture.
- Freezer: Freeze the uncut slab or individual squares for up to 2 months. Thaw at room temp or microwave briefly.
👉 For more freezer-friendly desserts, check out our White Chocolate Cranberry Cookies — they hold up beautifully for make-ahead holiday baking.
Nutritional Benefits of Gluten Free Brownies
While brownies are still a treat, gluten-free versions can have some unique perks:
- Safe for gluten-sensitive diets: Perfect for those with celiac disease or intolerance.
- Customizable ingredients: Use organic sugar or dairy-free butter to fit your needs.
- Antioxidants: Dark chocolate and cocoa are rich in flavonoids.
- Whole-grain blends: Many gluten-free flours incorporate nutritious grains or nut flours.
Indulge in Guilt-Free Treats
These Gluten Free Brownies are proof that decadent desserts don’t need gluten to taste incredible. With their shiny tops, gooey centers, and deep chocolate flavor, they’ll win over everyone at the table.
Serve them alongside Cardamom Shortbread Cookies with Orange Glaze for a sophisticated dessert spread, or keep a batch in your freezer for those late-night cravings. Either way, this is a recipe you’ll come back to again and again.
Gluten Free Brownies
Ingredients
Method
- Preheat & Prep: Preheat your oven to 350°F (175°C). Line an 8×8-inch square baking pan with parchment paper, leaving an overhang for easy lifting.
- Melt Butter & Chocolate: In a small saucepan over low heat, melt the butter and chopped dark chocolate together, stirring until smooth. Remove from heat and let cool slightly.
- (If using only cocoa powder, melt butter first, then whisk in cocoa.)
- Whisk Wet Ingredients: In a large mixing bowl, whisk together the sugar, eggs, and vanilla for 1–2 minutes until pale and slightly thickened. This helps create the shiny brownie top.
- Combine Mixtures: Slowly pour the melted chocolate mixture into the egg mixture, whisking constantly until glossy and smooth.
- Add Dry Ingredients: Sift in the gluten-free flour, cocoa powder, and salt. Gently fold together with a spatula until just combined — do not overmix.
- Add Mix-Ins: Fold in chocolate chips, nuts, or any other add-ins if using.
- Bake: Pour the batter into the prepared pan, spreading evenly. Bake for 20–25 minutes, or until the center is set but still slightly soft. A toothpick should come out with moist crumbs, not clean.
- Cool & Slice: Allow brownies to cool completely in the pan for at least 30 minutes. Lift out using parchment paper and slice into squares.
Notes
- Flour: Use a trusted 1:1 gluten-free flour blend that includes xanthan gum for best results.
- Don’t overbake: Slight underbaking gives that signature fudgy center.
- Cooling is key: Cutting too soon can cause them to crumble. Let them set before slicing.
- Flavor Boosters: Add espresso powder for deeper chocolate flavor, or swirl in peanut butter or caramel for variations.
- Storage:
- Room temperature: 3 days in an airtight container.
- Refrigerator: 5 days.
- Freezer: Up to 2 months — thaw before serving.
- Room temperature: 3 days in an airtight container.